untung99.homes: The Envelope Tool in CorelDRAW
Untung99 menawarkan beragam permainan yang menarik, termasuk slot online, poker, roulette, blackjack, dan taruhan olahraga langsung. Dengan koleksi permainan yang lengkap dan terus diperbarui, pemain memiliki banyak pilihan untuk menjaga kegembiraan mereka. Selain itu, Untung99 juga menyediakan bonus dan promosi menarik yang meningkatkan peluang kemenangan dan memberikan nilai tambah kepada pemain.
Berikut adalah artikel atau berita tentang Harian untung99.homes dengan judul untung99.homes: The Envelope Tool in CorelDRAW yang telah tayang di untung99.homes terimakasih telah menyimak. Bila ada masukan atau komplain mengenai artikel berikut silahkan hubungi email kami di koresponden@untung99.homes, Terimakasih.
Envelopes are used to re-shape objects such as a curve, group of curves, artistic or paragraph text, or bitmap images, either by dragging the nodes that surround the object, or by fitting the object to an existing curve. Because enveloped are applied non-destructively, they can be edited or removed, and the original object is preserved.
Click on any of the images below to view full-size.
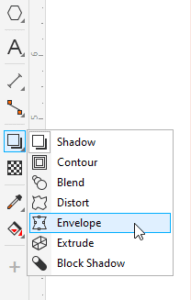
The Envelope tool is part of the Effects tool group.
There is also an Envelope docker, or Envelope inspector on the Mac, which can be opened by going to Window > Dockers > Effects > Envelope. On the PC, the shortcut to open this docker is Ctrl + F7, and on the Mac it’s Shift + Ctrl + E.
The options in the Envelope docker are the same ones that appear on the property bar when the Envelope tool is activated.
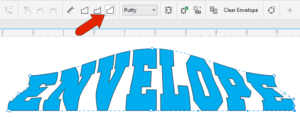
This example consists of a simple artistic text object. With the Envelope tool active, and the text selected, the property bar has four envelope modes. We’ll start with Straight line mode.
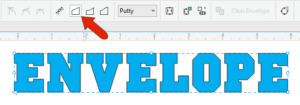
In this mode, corner nodes can be dragged both horizontally and vertically, and middle nodes can be dragged either horizontally or vertically.
For all envelope modes, holding the Shift key while dragging moves opposite nodes in opposite directions.

Holding the Ctrl key while dragging moves opposite nodes in the same direction.

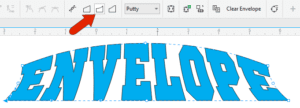
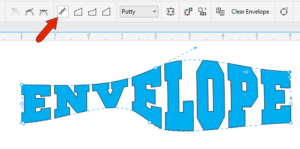
Single arc mode works in a similar way. Dragging middle nodes produces arcs in one direction, and corner nodes produce arcs in either direction.
Dragging nodes in Double arc mode produces S-curves, in which the tangency at either end stays the same.
In all three of these modes, you can’t adjust curve tangency at any node. But you can do this in Unconstrained mode, which creates a freeform envelope. Unconstrained nodes can be used to reshape the envelope in ways that can’t be done in the other modes.
For example, you can:
- drag nodes anywhere
- drag arrows to adjust tangency
- select a corner node and change it to a smooth node
- select a smooth node and change it to a cusp node that can have different tangency on either side
- double-click to add nodes
- double-click a node to remove it
- drag to marquee-select a group of nodes to change or move them all at once
To start over, or to remove the envelope, click the Clear Envelope button on the property bar.
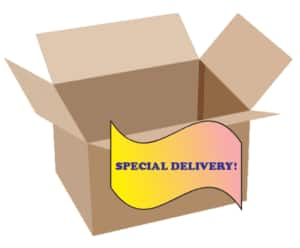
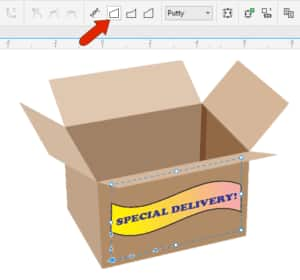
A simple application for the Envelope tool is to place an object in perspective. In this example, the banner shape and artistic text are a grouped object.
With the group selected with the Pick tool, and the Envelope tool active, you can use Straight line mode and drag corner nodes to match the side of the box.
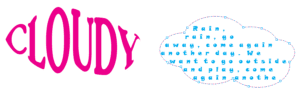
Artistic Text Envelopes
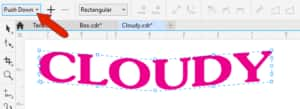
Another common application is to fit artistic text to a shape. There are several presets listed in the Preset list dropdown on the property bar, such as Circular or Push Down. The Envelope docker has even more preset choices.
To fit the text to a shape, click the Create envelope from icon on the property bar. This will create an envelope that is based on the shape of another object – in this case, the cloud shape.
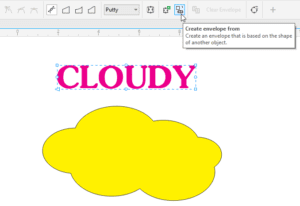
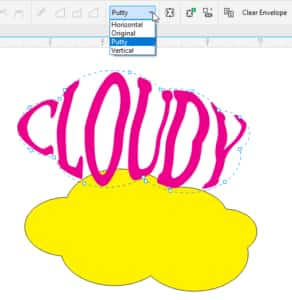
Then click the cloud to fit the text to. The envelope Mapping mode affects how the object fits to the envelope shape. Choose a mode from the Mapping mode dropdown list on the property bar:
- Original mode maps object corners, then maps other nodes linearly.
- Putty mode maps object corners only.
- Horizontal and Vertical modes stretch the object to the shape’s basic dimensions then compress in either direction to fit.
Even when the original curve is removed, the envelope is still applied. Our example now has some paragraph text added to the side. With the paragraph text selected, and the Envelope tool active, click the Copy envelope properties icon on the property bar.
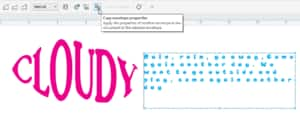
After clicking the artistic text to copy its envelope, its cloud-shaped envelope is applied to the paragraph text.
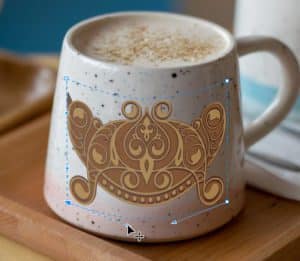
Designers often need to provide their clients with mockups of branded items, and using the Envelope tool helps make these mockups look more realistic. In this example, we’ll use the Envelope tool to fit the logo on the right to match the perspective of the mug in the image on the left.
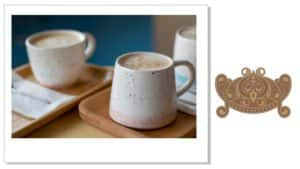
The first step is to select the logo with the Pick tool, move it approximately into place on the mug, and resize to fit.
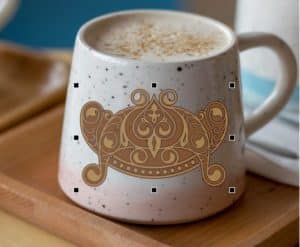
After activating the Envelope tool, because we’re working with a basically rectangular object, you can simplify the envelope shape by double-clicking to delete the middle nodes.
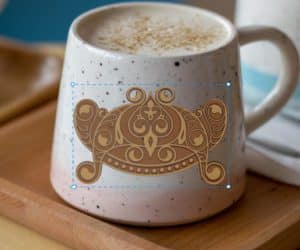
Now you can drag corner nodes into place, and click nodes to adjust the tangency of the envelope shape.
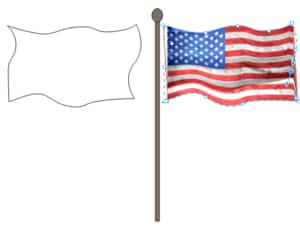
Envelopes can also be used to fit a bitmap image to a curve. This example consists of a closed curve drawn with the Pen tool, and an imported bitmap image of a flag.
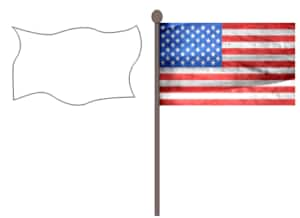
With the Envelope tool you can fit the bitmap to the curve, so that the flag appears to be waving in the wind.